Ever had your PC act up after a bad update or rogue software? Don’t panic—System Restore might just be your digital lifeline. This powerful Windows feature can turn back the clock on system changes, fixing issues without losing your files. Let’s dive into how it works and how to master it.


What Is System Restore and How Does It Work?
System Restore is a built-in recovery tool in Microsoft Windows that allows users to revert their computer’s system files, settings, and registry to a previous state. Think of it as a time machine for your operating system—without affecting personal files like documents, photos, or emails.
Understanding Restore Points
At the heart of System Restore are restore points—snapshots of your system at specific moments. These are created automatically before major system events like software installations, Windows updates, or driver changes. You can also create them manually.
- Automatic restore points are generated weekly and before significant system changes.
- Manual restore points let you lock in a stable system state before experimenting with new software.
- Restore points store system files, registry keys, and installed programs—but not personal data.
How System Restore Preserves Your Data
One of the biggest misconceptions about System Restore is that it deletes personal files. In reality, it only rolls back system-level changes. Your documents, music, videos, and downloads remain untouched.
“System Restore doesn’t affect personal files, so you won’t lose photos, documents, or emails when using it.” — Microsoft Support
However, programs installed after the restore point will be removed, and system settings will revert. This makes it ideal for undoing problematic updates or driver installations.
When Should You Use System Restore?
Knowing when to trigger a system restore can save you hours of troubleshooting. It’s not a fix for everything, but it shines in specific scenarios where system stability is compromised.
After a Failed Windows Update
Windows updates are essential, but they don’t always go smoothly. A faulty update can cause boot failures, performance drops, or driver conflicts. If your PC becomes unstable after an update, System Restore can roll back to a working state before the update was applied.
- Look for symptoms like blue screens, slow boot times, or missing drivers.
- Use System Restore immediately to avoid compounding issues.
- Check Microsoft’s update history to confirm if others are reporting similar issues.
Following Malware or Virus Infections
Some malware modifies system files or registry entries to persist on your machine. While antivirus software can remove the threat, it may not fully repair system damage. System Restore can revert those changes, returning your system to a clean state—provided the restore point predates the infection.
However, be cautious: older versions of System Restore could inadvertently restore malware if the restore point was created while the system was infected. Modern Windows versions have improved security, but it’s still best to run a full antivirus scan before and after restoration.
Recovering from Driver or Software Conflicts
Installing incompatible drivers or buggy software can destabilize your system. If your PC crashes after installing a new graphics driver or utility software, System Restore offers a clean way out.
- Roll back to a point before the driver installation.
- Reinstall the correct driver version afterward.
- Always download drivers from official manufacturer websites.
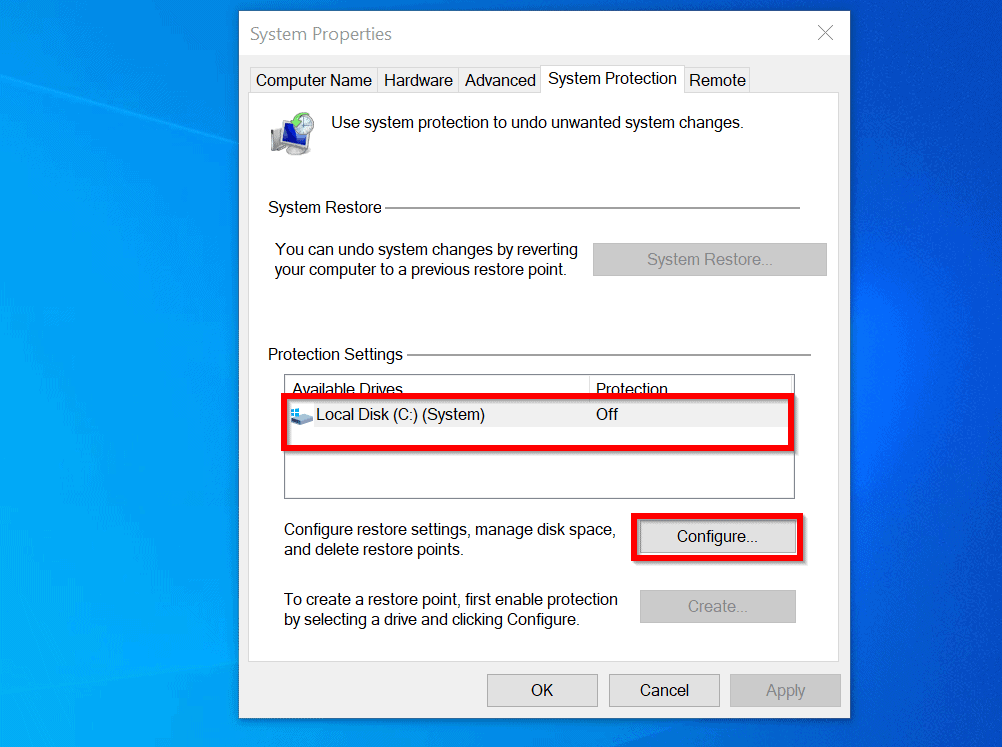
How to Enable and Configure System Restore
System Restore isn’t always enabled by default, especially on new installations or after a clean Windows setup. You’ll need to activate it manually for each drive where you want protection.
Enabling System Restore on Windows 10/11
To turn on System Restore, follow these steps:
- Press Windows + R, type
sysdm.cpl, and press Enter. - Go to the System Protection tab.
- Select your system drive (usually C:), then click Configure.
- Choose Turn on system protection.
- Adjust the disk space usage (recommended: 5–10%).
- Click OK to save.
Once enabled, Windows will begin creating automatic restore points. You can verify this by checking the “Last Run” time under the protection settings.
Setting Disk Space Limits for Restore Points
System Restore uses disk space to store snapshots, so it’s important to manage how much it consumes. By default, it’s capped at around 5–10% of your drive’s capacity.
- Too little space means fewer restore points and shorter retention.
- Too much space can impact overall storage, especially on smaller SSDs.
- Adjust the slider in the Configure window to balance protection and performance.
Microsoft recommends at least 300MB for system protection, but 5GB or more is ideal for regular use.
Scheduling Manual Restore Points
While automatic restore points are helpful, creating manual ones before major changes gives you more control. For example, create a restore point before:
- Installing new software or games.
- Updating critical drivers (GPU, motherboard, etc.).
- Performing system tweaks or registry edits.
To create one, go to System Properties > System Protection > Create, then name your restore point (e.g., “Before Adobe Install”).
Step-by-Step Guide to Performing a System Restore
When your system starts acting up, initiating a restore is straightforward. Here’s how to do it safely and effectively.
Accessing System Restore from Windows
If you can boot into Windows, use the built-in recovery tool:
- Open the Start menu and search for Create a restore point.
- Click System Restore in the System Properties window.
- Click Next and choose a restore point from the calendar.
- Select a point marked “Recommended Restore Point” or one you created manually.
- Click Next and confirm the restore.
The process will restart your PC and apply the changes. This can take 10–30 minutes depending on system complexity.
Using System Restore from Safe Mode
If Windows won’t start normally, boot into Safe Mode to access System Restore:
- Restart your PC and press F8 (or Shift + F8 on newer systems) during boot.
- Select Safe Mode with Command Prompt or use Windows Recovery Environment (WinRE).
- Navigate to Repair your computer > Troubleshoot > Advanced Options > System Restore.
Safe Mode loads minimal drivers, making it easier to run System Restore without interference from problematic software.
Restoring from Windows Recovery Environment (WinRE)
When the OS fails to boot, WinRE is your best bet. Access it by:
- Using a Windows installation USB/DVD and selecting Repair your computer.
- Triggering automatic recovery after three failed boot attempts.
- Using the Shift + Restart option from the login screen.
From WinRE, choose System Restore under Advanced Options. The interface is identical to the one in Windows, allowing you to pick a restore point and proceed.
Common Issues and Troubleshooting Tips
Even a robust tool like System Restore can run into problems. Here are common issues and how to resolve them.
System Restore Not Working or Stuck
Sometimes, System Restore fails to complete or gets stuck at a certain percentage. This can happen due to:
- Corrupted system files.
- Insufficient disk space.
- Conflicts with third-party antivirus software.
To fix this:
- Run
sfc /scannowin Command Prompt (Admin) to repair system files. - Disable antivirus temporarily.
- Free up disk space on the system drive.
- Try restoring from Safe Mode or WinRE.
Missing or Deleted Restore Points
If no restore points are available, it could be because:
- System Protection was disabled.
- Disk cleanup tools removed them (e.g., Disk Cleanup’s “Clean up system files” option).
- The volume shadow copy service (VSS) is not running.
To prevent this:
- Regularly create manual restore points.
- Avoid using aggressive cleanup tools that delete system files.
- Ensure the Volume Shadow Copy service is set to Automatic in Services (services.msc).
Dealing with “Access Denied” Errors
If you see “Access is denied” when trying to restore, it’s often a permissions issue. Run System Restore as an administrator:
- Press Windows + X and open Command Prompt (Admin).
- Type
rstrui.exeand press Enter. - This launches System Restore with elevated privileges.
If the issue persists, check your user account control (UAC) settings or log in as an administrator.
Alternatives to System Restore
While System Restore is powerful, it’s not the only recovery option. In some cases, alternatives may be more effective.
Using Windows Reset This PC
If System Restore fails, Reset This PC is a more drastic but reliable option. It reinstalls Windows while giving you the choice to keep your files.
- Keep my files: Removes apps and settings, keeps personal data.
- Remove everything: Full wipe, like a factory reset.
Access it via Settings > System > Recovery > Reset this PC. Learn more at Microsoft’s official guide.
Third-Party Backup and Recovery Tools
Tools like Macrium Reflect, Acronis True Image, or EaseUS Todo Backup offer full disk imaging, which is more comprehensive than System Restore.
- Create complete system images that can be restored to any drive.
- Schedule automatic backups.
- Restore to dissimilar hardware if needed.
These are ideal for users who want maximum control and reliability. Visit Macrium Reflect Free to get started.
Using File History and System Image Backup
Windows includes built-in tools for broader protection:
- File History: Continuously backs up personal files to an external drive.
- System Image Backup: Creates a full snapshot of your entire drive, including OS, apps, and files.
While System Image Backup is being phased out in newer Windows versions, it’s still available in Windows 10 and can be accessed via Control Panel. For more details, see Microsoft’s backup guide.
Best Practices for Using System Restore Effectively
To get the most out of System Restore, follow these expert tips to ensure it’s always ready when you need it.
Regularly Create Manual Restore Points
Don’t rely solely on automatic restore points. Make it a habit to create one before any major change:
- Before installing new software.
- Prior to driver updates.
- After a clean Windows installation.
This gives you a known-good state to fall back on, reducing recovery time during crises.
Monitor Disk Space and Restore Point Health
System Restore only works if it has space and functional restore points. Regularly check:
- Disk usage under System Protection settings.
- The list of available restore points.
- The status of the Volume Shadow Copy service.
If restore points are disappearing, investigate cleanup tools or malware that might be deleting them.
Combine System Restore with Other Backup Strategies
System Restore is not a full backup solution. Pair it with:
- Cloud backups (OneDrive, Google Drive) for personal files.
- External drive backups using File History.
- Full disk images for complete disaster recovery.
This layered approach ensures you’re protected against hardware failure, ransomware, and system corruption.
What if System Restore fails to fix my PC?
If System Restore doesn’t resolve the issue, try booting into Safe Mode and running a virus scan. You can also use the Startup Repair tool from Windows Recovery Environment. If problems persist, consider resetting your PC or performing a clean Windows installation.
Does System Restore remove viruses?
Not reliably. While it may remove system changes made by malware, it doesn’t guarantee complete removal. Always run a full antivirus scan before and after using System Restore to ensure your system is clean.
Can I use System Restore on SSDs?
Yes, System Restore works on SSDs without harming their lifespan. The feature uses minimal write cycles, and modern SSDs are designed to handle such operations. However, ensure you don’t allocate excessive disk space to restore points to avoid filling up your drive.
How long do restore points last?
Restore points are stored until the allocated disk space fills up. Windows automatically deletes the oldest ones to make room for new ones. With 10GB of space, you might retain points for several weeks. Manual points are preserved longer unless space is critically low.
Is System Restore available in Windows 11?
Yes, System Restore is fully supported in Windows 11. The interface and functionality are nearly identical to Windows 10. You can access it via System Properties or the Recovery settings in the Control Panel.
System Restore remains one of Windows’ most underrated yet powerful tools. By understanding how it works, when to use it, and how to maintain it, you can avoid many common system issues and recover quickly from disasters. Combine it with smart backup habits, and you’ll have a resilient, future-proof PC. Don’t wait for a crisis—set up System Restore today and stay protected.
Recommended for you 👇
Further Reading: